Unlike other options that feel flimsy or hard to install, the BENECREAT 12 Pcs Baseball Cap Button, 0.55 Inch Top really impressed me with its durable fabric-covered iron rivets. After hands-on testing, I found it straightforward to replace caps’ top buttons—just insert the rivet and press, no sewing needed. The size fit perfectly on most baseball caps, and the sturdy material held up well for repeated use.
This set offers great value with 12 buttons, making it ideal for quick repairs or DIY craft projects. The compact 0.55-inch size is unobtrusive yet strong, preventing easy cracking or bending. Plus, its wide application scope—from hats to scrapbooking—makes it versatile. I’ve tried other kinds that break or don’t hold, but this one solved my problem seamlessly. If you want a reliable, easy-to-use solution, I highly recommend giving the BENECREAT 12 Pcs Baseball Cap Button a try. It’s a smart choice for durable, hassle-free cap repairs and crafts.
Top Recommendation: BENECREAT 12 Pcs Baseball Cap Button, 0.55 Inch Top
Why We Recommend It: This product excels with its durable fabric and iron rivets that ensure a firm, long-lasting hold. Unlike others with weaker materials, the 0.55-inch size fits most caps comfortably. Its easy installation without sewing saves time, and the large quantity makes it perfect for multiple repairs. Compared to similar options, its combination of strong materials and straightforward use makes it the best value for your money.
Best glue to replace baseball cap button: Our Top 5 Picks
- BENECREAT 12 Pcs Baseball Cap Button, 0.55 Inch Top – Best glue for sewing on cap buttons
- BENECREAT 32Pcs 17mm Cloth Covered Metal Shank Buttons – Best Value
- 30Sets Hat Snap Button Kit – Baseball Cap Top Replacement, – Best Premium Option
- BENECREAT 32 Sets 17mm Baseball Cap Buttons for Hat Repair – Best glue to fix baseball cap buttons
- BENECREAT 20-Piece 5-Color Baseball Cap Button Set – Best for matching cap button colors
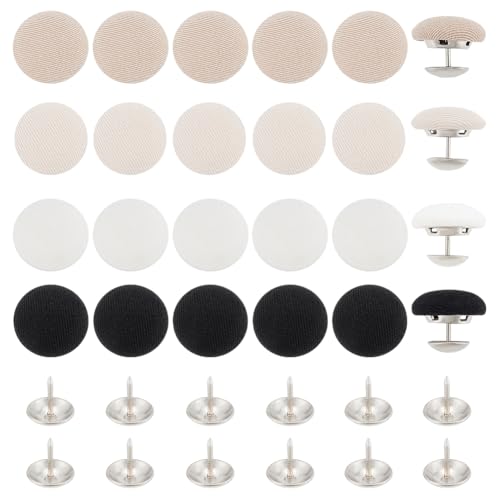
BENECREAT 12 Pcs Baseball Cap Button, 0.55 Inch Top

- ✓ Easy to install
- ✓ Durable materials
- ✓ Versatile use
- ✕ Slightly small size
- ✕ Limited to fabric-based projects
| Diameter | 14mm (0.55 inches) |
| Material | Fabric covered with iron rivets |
| Color | Black |
| Quantity | 12 sets (total of 12 buttons) |
| Ease of Installation | Insert rivet into fabric holes and secure without sewing |
| Application | Replacement for baseball cap top button, DIY crafts, garment sewing, scrapbooking, knitting, costume embellishment |
Pulling a worn-out or loose baseball cap button off my favorite hat, I was surprised by how straightforward the BENECREAT 12 pcs Baseball Cap Button kit made replacing it. The rivets are sturdy yet easy to handle, giving me confidence that I could do it myself without any sewing skills.
The size is just right—about 14mm—which fits most standard caps perfectly. The material feels durable; the fabric covered with iron rivets feels tough and not flimsy, so I don’t worry about it deforming after a few wears.
It snaps into place smoothly, and the process is quick—no fuss, no complicated tools needed.
What impressed me most is how versatile these buttons are. Besides repairing caps, I found they work great for DIY projects, scrapbooking, or even fashion embellishments.
The set includes 12, so I have plenty for multiple repairs or creative ideas.
Installing the rivets is surprisingly simple—you just insert the rivet through the fabric hole and press. It feels secure once done, and I appreciate that I don’t need to sew or glue.
It’s a real time-saver and perfect for quick fixes.
If you’re tired of your cap looking worn out or just want a reliable replacement, these buttons are a solid choice. They hold tight and look neat, restoring your hat’s style without a trip to the store.
Overall, a handy, budget-friendly solution for cap repairs and beyond.
BENECREAT 32Pcs 17mm Cloth Covered Metal Shank Buttons

- ✓ Easy to install
- ✓ Wide color variety
- ✓ Durable metal shank
- ✕ Slightly stiff for delicate fabrics
- ✕ Larger size may not suit all projects
| Material | Cloth covered with metal shank |
| Diameter | 17mm (0.67 inches) |
| Color Options | Black, white, beige, light blue, dark blue, dark red, tan, dark green, and mixed |
| Quantity | 32 pieces |
| Installation Method | Insert rivet into fabric button holes without sewing |
| Intended Uses | Clothing, crafts, scrapbooking, button art |
Unlike the usual glue fixes I’ve tried, these cloth-covered buttons from BENECREAT instantly caught my eye with their colorful variety and sturdy metal shank details. The 17mm size feels just right—small enough to blend seamlessly with casual outfits but still noticeable enough to make a statement.
I was curious how easy they’d be to attach without sewing, and honestly, it’s surprisingly straightforward.
All you do is insert the rivet into the fabric hole and press it firmly. No fuss, no mess, no sewing needed.
The textured cloth surface gives them a nice, matte look that’s different from shiny plastic buttons. I tested them on denim jackets and bags, and they sat snugly without wobbling or slipping out.
The color options are pretty impressive—eight shades to match everything from a dark blue coat to a beige backpack. I loved how versatile they are, whether you’re replacing a cap button or customizing a craft project.
The metal shank feels durable and well-made, promising they’ll hold up over time.
On the downside, because they’re metal-backed, they might be a bit stiff for very delicate fabrics. Also, at 17mm, they’re a little larger than some original buttons, so double-check your size before ordering.
Still, for quick fixes or creative projects, these buttons are a solid choice that combines style and ease of use.
30Sets Hat Snap Button Kit – Baseball Cap Top Replacement,

- ✓ Easy to install
- ✓ Durable materials
- ✓ Versatile use
- ✕ Size confirmation needed
- ✕ Not suitable for all fabric types
| Material | Cotton cloth covered buttons with aluminum metal rivets |
| Button Size | Not specified, but designed to fit standard baseball cap top buttons |
| Quantity | 30 sets (each set includes one button and rivet) |
| Application Compatibility | Suitable for baseball caps, berets, canvas backpacks, denim clothing, and crafts |
| Installation Method | No sewing required; insert rivet and tap with hammer for secure attachment |
| Color | Black |
Unlike the usual glue or sewing kits I’ve tried before, this 30Sets Hat Snap Button Kit feels like a real upgrade for quick fixes and creative projects. The moment I saw the black buttons with their smooth cotton finish, I knew they’d blend seamlessly into most hats without standing out.
What immediately caught my attention was how easy they are to install. No sewing needed—just insert the rivet into the hole, tap it with a hammer, and done.
It’s surprisingly fast, especially if you’re fixing multiple caps or working on a craft project. The aluminum nails feel sturdy and hold firmly once tapped in.
The buttons themselves are comfortable to the touch and breathable, making them perfect for hats that get a lot of wear. Plus, they’re versatile—great for replacing baseball cap tops, decorating berets, or even customizing backpacks and denim.
I liked that I could use them on different fabrics without worry about damage or discomfort.
The package contains 30 pieces, which is more than enough for several repairs or DIY projects. It’s a practical set if you’re into crafting or just hate the hassle of sewing.
The only thing to watch out for is confirming the right size before starting—these are not one-size-fits-all, so measurement matters.
Overall, this kit offers a solid, no-fuss solution for replacing or adding buttons on various fabric items. The quality feels reliable, and the process is straightforward enough for even beginners.
It’s a handy addition to your toolkit for quick fixes and creative customization.
BENECREAT 32 Sets 17mm Baseball Cap Buttons for Hat Repair
- ✓ Easy to install
- ✓ Durable material
- ✓ Wide color options
- ✕ Size may not fit all caps
- ✕ Rivets can be tricky to align
| Button Diameter | 17mm (0.67 inches) |
| Button Thickness | 7mm |
| Rivet Size | 11x3mm |
| Material | Cloth fabric covered with iron rivets |
| Quantity | 32 sets (approximately 64 buttons) |
| Color Options | 4 colors |
Many people assume that replacing a baseball cap button requires complicated sewing or specialized tools. But after trying these BENECREAT buttons, I found that’s simply not true.
The buttons come in a sturdy package with 32 sets, so you’re never short on replacements. The fabric-covered top feels durable yet smooth to the touch, and the 17mm diameter is just right—not too big or small for most caps.
What really surprised me was how easy they are to install. You just insert the rivet into the button and press it into place.
No sewing needed, which means you can fix your cap in minutes, even if you’re not handy with a needle.
Handling the buttons is straightforward. The rivets stay secure, and the iron rivet won’t bend or break easily.
Plus, the variety of colors lets you match your hat perfectly or add a fun contrast.
Beyond caps, I tried using them on a denim jacket and a canvas backpack. They worked just as well, making this set versatile for various projects.
Overall, these buttons save you time and frustration. They’re durable, easy to use, and come in plenty of colors.
If your favorite cap’s button is worn or missing, this set is a hassle-free fix.
BENECREAT 20-Piece 5-Color Baseball Cap Button Set

- ✓ Easy to install
- ✓ Durable and sturdy
- ✓ Wide color selection
- ✕ Slightly more effort than glue
- ✕ Not for all hat styles
| Material | Cotton for buttons and aluminum for studs |
| Button Diameter | 14.5mm (0.57 inches) |
| Button Height | 5.5mm (0.22 inches) |
| Color Options | 5 colors with 4 sets each, total 20 sets |
| Installation Method | Hammer tap without sewing |
| Application | Repair and replacement for baseball cap buttons, also suitable for DIY crafts and sewing projects |
Replacing a worn-out baseball cap button with glue? I’ve tried that route, and it always felt like a gamble—sometimes it works, other times it just falls off after a few wears.
With the BENECREAT 20-Piece 5-Color Baseball Cap Button Set, I finally found a straightforward solution that feels reliable. The set comes with 20 groups of buttons in five different colors, so matching my cap’s hue was a breeze.
The buttons themselves are a good size—14.5mm diameter, not too small or bulky. The cotton material makes them breathable, which is perfect for keeping my hat comfortable.
The metal studs are sturdy but easy to bend, so I could fix or replace the buttons without any special tools.
Installation was surprisingly simple. No sewing needed; I just placed the button through the hat, then tapped it with a hammer, and it stayed put.
It felt secure enough to handle regular wear and tear, unlike glue that can weaken over time.
This set isn’t just for baseball caps—I’ve used it for DIY crafts and even some costume embellishments. It’s versatile and comes in bulk, so I have plenty for future repairs or projects.
Overall, it’s a solid choice if you want a quick, durable fix without messing around with messy glue.
Wearing my hat now, I hardly notice the new buttons—they look and feel just like the original ones. No more worrying about my cap falling apart during a game or a day out.
What is the Best Glue to Replace a Baseball Cap Button?
The best glue to replace a baseball cap button is a strong adhesive that can securely bond fabric to fabric or fabric to plastic, depending on the cap’s construction. The most recommended types of glue for this purpose include fabric glue, hot glue, and epoxy, as they provide durability and flexibility suitable for wear and tear.
According to Crafting a Green World, fabric glue is specifically designed for textile applications and is ideal for projects involving fabric, offering a strong bond that remains flexible after drying. Hot glue is another option that provides a quick-setting solution, while epoxy can create a very strong bond suitable for applications requiring additional strength.
Key aspects of using the best glue to replace a baseball cap button include the material compatibility, drying time, and flexibility of the adhesive. Fabric glues generally dry clear and remain flexible, which is essential for items like baseball caps that undergo bending and stretching. Additionally, hot glue is quick to set, allowing for immediate use, whereas epoxy tends to take longer to cure but results in a much stronger bond, making it suitable for heavy-duty repairs.
This topic is particularly relevant for sports enthusiasts and casual wearers alike, as a damaged button can compromise the aesthetic and functionality of a baseball cap. The button serves both a decorative and a practical purpose, ensuring that the cap retains its shape and stays securely fitted. Statistics indicate that millions of baseball caps are sold annually, and maintaining them is crucial for both personal style and potential resale value.
The impact of using the right glue can lead to extended life for an accessory that is often a key part of one’s wardrobe. By effectively repairing a baseball cap button, users can save money on replacements and minimize waste, aligning with sustainable practices. Additionally, a well-maintained cap can enhance one’s appearance and provide personal comfort.
Best practices for replacing a baseball cap button include cleaning the area where the button will be attached to ensure a strong bond, applying the adhesive sparingly to avoid overflow, and allowing adequate drying time as per the adhesive’s instructions. It’s advisable to test the glue on a small, inconspicuous area first to ensure compatibility with the cap’s material.
Which Types of Glue are Most Effective for Fabric?
The most effective types of glue for replacing a baseball cap button are:
- Fabric Glue: This type of glue is specifically designed for bonding fabric materials and is often washable and flexible.
- Hot Glue: Hot glue provides a strong bond quickly and is ideal for fabric applications, but it can be less flexible than fabric glue.
- Super Glue (Cyanoacrylate): This fast-acting adhesive creates a permanent bond and works on a variety of materials, including fabric, though it can become brittle over time.
- Epoxy Adhesives: Known for their strong bonding properties, epoxy adhesives can securely attach fabric buttons to caps, but they require mixing before use.
- Contact Cement: This versatile adhesive is used for bonding fabric to other surfaces, offering a strong hold, but requires careful application to avoid mess.
Fabric Glue: Fabric glue is formulated to be flexible and withstand washing, making it ideal for use on clothing items like baseball caps. It adheres well to textiles without causing stiffness, allowing the cap to maintain its original shape and comfort.
Hot Glue: Hot glue is a quick and effective option for attaching fabric buttons, as it dries rapidly and forms a strong bond. However, it’s important to apply it sparingly and avoid overheating, which could damage the fabric or cause the button to detach over time.
Super Glue (Cyanoacrylate): Super glue offers a strong and quick bond, making it suitable for repair tasks where immediate results are desired. While it can work on fabric, it is best used for small repairs due to its rigid nature once cured, which may not allow for flexibility in the fabric.
Epoxy Adhesives: Epoxy adhesives consist of a resin and hardener that create an extremely strong bond once cured. They are particularly useful for heavier buttons or when a more permanent fix is needed, but the mixing process can be a drawback for quick repairs.
Contact Cement: Contact cement is effective for bonding fabric to a variety of surfaces, including other fabrics or hard materials. Its strong initial grab allows for repositioning before the final bond sets, but it requires careful application to prevent excess glue from seeping out.
How Do Fabric Glues Differ from All-Purpose Glues?
Fabric glues and all-purpose glues serve different functions and are formulated for specific materials.
- Fabric Glue: This type of adhesive is specifically designed for bonding fabrics and textiles together.
- All-Purpose Glue: A versatile adhesive that can bond a wide range of materials, including wood, plastic, metal, and some fabrics.
Fabric Glue: Fabric glues are often water-based and flexible once dry, allowing for movement in the fabric without cracking or breaking. They typically dry clear and are washable, making them ideal for fabric crafts, repairs, and projects where a strong yet flexible bond is needed, such as replacing a baseball cap button.
All-Purpose Glue: All-purpose glues can be effective for many tasks but may not provide the same level of flexibility or durability on fabric as fabric glues. They often dry hard, which can lead to a stiff bond that may not withstand the wear and tear of regular use on items like clothing or caps, making them less suitable for tasks requiring a soft and flexible finish.
What Factors Should You Consider When Choosing Glue for a Baseball Cap?
When choosing glue for replacing a baseball cap button, several factors are essential to ensure durability and appropriate adhesion.
- Material Compatibility: It’s crucial to select a glue that bonds well with the fabric of the cap and the button material.
- Flexibility: The glue should remain flexible after curing to withstand the movement and bending of the cap.
- Water Resistance: Opt for a glue that is water-resistant or waterproof to prevent deterioration from moisture or sweat.
- Drying Time: Consider the drying time of the adhesive, as some may require longer curing periods which can delay use.
- Non-Toxicity: If the cap will be worn frequently, choose a non-toxic glue to ensure safety against potential skin irritation.
- Ease of Use: A user-friendly application method can make the repair process smoother and more efficient.
Material Compatibility: The best glue should bond effectively with both the fabric of the cap and the button, which can be made of plastic, metal, or fabric. This ensures that the button remains securely attached and does not detach after a few uses.
Flexibility: Since a baseball cap is subjected to various movements, the adhesive must remain flexible once cured. Rigid glues can crack or break under stress, leading to the button falling off.
Water Resistance: Baseball caps often come into contact with sweat and rain. A water-resistant adhesive will help maintain the integrity of the bond in wet conditions, preventing the button from loosening over time.
Drying Time: Different glues have varying drying times, and some may require clamping or additional support until fully cured. Quick-drying options can be beneficial for those needing immediate use of the cap.
Non-Toxicity: Since the cap will be worn on the head, it’s essential to choose a glue that is non-toxic and safe for skin contact. Toxic adhesives can cause allergic reactions or irritation with prolonged wear.
Ease of Use: A glue that is easy to apply, perhaps with a precise applicator or a simple tube, can make the repair process more accessible, especially for those who may not have experience with crafting or repairs.
How Important is Drying Time in Your Choice of Glue?
Drying time is a crucial factor to consider when choosing glue for replacing a baseball cap button.
- Instant Adhesives: These glues often set within seconds to a few minutes, making them ideal for quick repairs.
- Epoxy Resins: Typically, these adhesives have longer drying times, usually requiring several hours to cure fully, which can be beneficial for achieving a strong bond.
- Fabric Glues: Designed specifically for textiles, these glues may have moderate drying times, generally taking about 30 minutes to an hour to set, allowing for repositioning if needed.
- Hot Glue: This type of adhesive dries quickly, often within minutes, but may not provide the durability needed for a long-lasting fix.
Instant Adhesives: These glues, often cyanoacrylate types, bond almost immediately upon contact, making them perfect for urgent repairs like a baseball cap button. However, while they are fast, they may not fill gaps well and can become brittle over time.
Epoxy Resins: Epoxies provide a robust bond and are resistant to heat and moisture, which is crucial for items like caps that may undergo wear and tear. Though they take longer to cure, this allows for a more thorough bonding process that enhances durability.
Fabric Glues: Fabric glues are specifically formulated to work with materials like cotton and polyester, making them an excellent choice for fabric caps. They usually allow for some flexibility and are machine washable, ensuring the cap remains intact after cleaning.
Hot Glue: Hot glue is quick to use and easy to apply, making it a popular choice for DIY repairs. However, while it sets fast, its long-term reliability can be questionable, especially in outdoor conditions where heat may soften the bond.
Does Water Resistance Matter When Selecting Glue for a Cap?
When selecting glue for replacing a baseball cap button, water resistance plays a critical role, especially if the cap is frequently worn outdoors. A water-resistant adhesive ensures that the bond remains strong and durable even when exposed to moisture, which can lead to wear and tear on non-waterproof alternatives.
Key considerations regarding water resistance include:
-
Types of Materials: Different environmental conditions can affect adhesion. Caps made from cotton or polyester blend fabrics may require different glues. Choose a flexible, waterproof adhesive like silicone-based or polyurethane glues to maintain the integrity of the fabric.
-
Usage Context: If the cap will be worn during outdoor activities or in wet weather, selecting an adhesive specifically marketed as waterproof is essential. This not only preserves the button but also enhances the cap’s longevity.
-
Drying and Setting Time: Water-resistant glues often require specific drying conditions. Ensure the area is dry while the glue sets to achieve a robust bond.
In summary, opting for a water-resistant glue not only aids in the immediate fix but also provides long-term durability, particularly important for items like baseball caps that are regularly exposed to varying elements.
What Steps Should You Follow to Replace a Baseball Cap Button?
To effectively replace a baseball cap button, you should follow a series of steps to ensure a secure and lasting fix.
- Gather Materials: You will need a replacement button, suitable adhesive, and basic tools.
- Select the Best Glue: Choose a strong, fabric-compatible adhesive that can withstand wear and tear.
- Remove the Old Button: Carefully detach the existing button using tools like pliers or a seam ripper.
- Prepare the Surface: Clean the area where the button will be attached, removing any remnants of glue or fabric.
- Apply the Glue: Generously apply the chosen adhesive to both the button and the cap’s surface.
- Attach the New Button: Firmly press the new button into place and hold it for the recommended drying time.
- Let it Cure: Allow the glue to fully cure according to the manufacturer’s instructions before using the cap.
Gathering materials is essential to make the repair process smooth and efficient. You will need a replacement button that matches the original size and color, a strong adhesive that is compatible with both fabric and plastic, and tools such as pliers for removal and a cloth for cleaning.
Selecting the best glue is crucial for ensuring the durability of the repair. Look for adhesives specifically designed for fabric or multi-surface use, such as E6000 or fabric glue, which can provide a robust bond while remaining flexible.
When removing the old button, take care not to damage the surrounding fabric. Use pliers to gently pull off the button or a seam ripper to cut the threads, ensuring you do not tear the cap material.
Preparing the surface is a critical step; clean the area thoroughly with rubbing alcohol or a damp cloth to remove any dirt or leftover adhesive, which helps the new button adhere better.
When applying the glue, use a sufficient amount to cover both the button and the cap’s surface, ensuring a strong bond. Follow the instructions on the glue packaging for the best results.
Once the glue is applied, attach the new button by pressing it firmly into place. Ensure it is aligned correctly and held tightly for a few moments to secure the bond.
Finally, letting the glue cure completely is vital; follow the drying time recommended by the manufacturer to avoid any premature detachment. This will ensure that the button stays firmly in place during use.
How Do You Prepare Your Cap for Button Replacement?
When preparing your cap for button replacement, it’s essential to follow a few key steps to ensure a successful repair.
- Gather Necessary Tools: Before starting, make sure you have all the tools you need, including a replacement button, the best glue for fabric, scissors, and a clean workspace.
- Remove the Old Button: Carefully detach the old button from the cap by cutting any threads or using a seam ripper, ensuring not to damage the fabric of the cap.
- Clean the Area: Clean the area where the button was attached to remove any residue or leftover glue, which helps the new button adhere better.
- Apply the Best Glue: Choose a high-quality fabric glue, which is flexible and durable, and apply it generously to the base of the new button.
- Attach the New Button: Press the new button firmly onto the cap, ensuring it is aligned properly, and hold it in place for the recommended time according to the glue’s instructions.
- Allow to Cure: Let the glue cure completely as per the manufacturer’s guidelines before using the cap to ensure a strong bond.
Gathering the necessary tools ensures that you are fully prepared for the task without interruptions. This includes a suitable replacement button that matches the original, a reliable fabric glue for a strong hold, and scissors for any adjustments that may be needed.
When removing the old button, it’s crucial to be gentle to avoid damaging the surrounding fabric. A seam ripper can be particularly useful for this task, allowing for precise cuts without creating larger holes in the cap.
Cleaning the area where the button will be reattached is an important step, as any leftover glue or debris can interfere with the adhesive properties of the new glue. Use a damp cloth or rubbing alcohol to ensure the surface is clean.
Choosing the best glue for fabric is vital; look for a product specifically designed for textiles, as it will provide the flexibility and strength needed for items that experience movement and wear.
When attaching the new button, ensure it is centered and pressed down firmly to create a good bond. You may need to hold it in place for a few minutes or use a weight to ensure it adheres properly while the glue sets.
Lastly, allowing the glue to cure completely is essential for ensuring the durability of the button attachment. Follow the glue’s instructions for curing times, which can vary based on the product used.
What Techniques Can You Use to Ensure a Durable Bond?
To ensure a durable bond when replacing a baseball cap button, several techniques can be utilized:
- Surface Preparation: Properly preparing the surfaces of both the button and the cap is essential for a strong bond. This may involve cleaning the areas with rubbing alcohol to remove any dirt or oils that could prevent adhesion.
- Choosing the Right Adhesive: Selecting the best glue is crucial; options like fabric glue, epoxy, or super glue can provide varying strengths and flexibility. Each type of adhesive has its specific properties that make it suitable for different materials and conditions.
- Applying the Adhesive Correctly: When applying glue, use an even and adequate amount to cover the surfaces without overdoing it, which can lead to excess squeeze-out. It’s also important to follow the manufacturer’s instructions on how to apply the glue for optimal results.
- Clamping or Holding in Place: After applying the adhesive, holding the button in place or using clamps can help ensure a tight bond as the glue cures. This prevents any movement that could weaken the bond as it sets.
- Curing Time: Allowing sufficient time for the adhesive to cure is critical; some glues require several hours or even overnight to achieve maximum strength. Be sure to avoid handling the cap during this period to prevent disrupting the bond.
- Testing the Bond: Once the adhesive has cured, gently test the bond by applying slight pressure to ensure it has set properly. If the button feels loose or the bond appears weak, consider reapplying the adhesive or using a stronger alternative.
What Are the Limitations of Using Certain Types of Glue?
The limitations of using certain types of glue for replacing a baseball cap button include factors such as adhesion strength, drying time, and material compatibility.
- Super Glue (Cyanoacrylate): Super glue offers a strong bond and quick drying time, but it can become brittle over time, especially with exposure to moisture or heat. This may lead to the button detaching again if the cap is washed or worn in hot conditions.
- Hot Glue: Hot glue is easy to apply and dries quickly, making it a convenient choice. However, it may not create a lasting bond on fabrics, particularly if the cap experiences flexibility or stress, leading to the button falling off after some wear.
- Fabric Glue: Fabric glue is designed to bond textiles securely, making it a suitable option for fabric caps. However, it often requires a longer drying time and may not adhere as effectively to plastic or metal buttons, limiting its versatility.
- Epoxy Glue: Epoxy provides a very strong bond and is great for materials like plastic and metal. However, it can take a long time to cure fully, and the application process can be messier than other adhesives, which might be a drawback for quick repairs.
- Hot Melt Adhesives: Hot melt adhesives work well for diverse materials and provide a strong bond. However, they can be affected by heat, meaning that if the cap is left in a hot environment, the adhesive might weaken, causing the button to detach.
Which Glues Might Damage the Fabric of Your Cap?
The best glues to replace a baseball cap button can vary in effectiveness and safety for the fabric involved.
- Super Glue (Cyanoacrylate): This fast-drying adhesive can bond quickly, but it can also harden and become brittle, potentially damaging the fabric if not applied carefully.
- Hot Glue: While convenient for quick repairs, hot glue can create a stiff bond that may pull on the fabric or cause it to warp, especially if the glue is applied too thickly.
- Fabric Glue: Specifically designed for textiles, this glue has the flexibility to stretch with the fabric, minimizing damage, but may not provide as strong of a hold as other adhesives.
- Epoxy: This two-part adhesive is incredibly strong and can bond various materials but can be overly rigid once cured, leading to potential tears in softer fabrics.
- School Glue (PVA): Although safe for fabric and easy to clean up, it may not hold up well under wear and tear, making it a less durable option for a cap button replacement.
Super Glue is known for its quick bonding capabilities, but its rigid nature can lead to issues if the cap fabric needs flexibility. Hot glue is another option that provides a rapid fix, but it can become hard and create an unyielding bond, risking fabric deformation. Fabric glue is ideal for maintaining the integrity of the material, providing a flexible hold, although it may require more time to cure fully. Epoxy is another strong alternative but could lead to fabric tears due to its stiffness. Lastly, school glue is easy to use and safe but might not withstand the test of time under normal cap usage.
What Common Mistakes Should You Avoid When Gluing a Cap Button?
When replacing a baseball cap button, there are several common mistakes to avoid to ensure a successful repair.
- Using the Wrong Type of Glue: It is crucial to select a glue that is specifically designed for fabric or flexible materials. Using super glue or other rigid adhesives can result in a stiff bond that may not withstand the wear and tear of a cap.
- Insufficient Cleaning of the Surface: Failing to clean the area where the button will be attached can lead to poor adhesion. Any dirt, oil, or old adhesive residue can prevent the glue from forming a strong bond, ultimately causing the button to fall off again.
- Applying Too Much Glue: Over-applying glue can create a mess and lead to a long drying time. Excess glue can ooze out around the edges, making the repair look unprofessional and potentially affecting the cap’s fit and comfort.
- Ignoring Drying Time: Not allowing sufficient time for the glue to cure can compromise the repair. Each type of glue has different drying times, and rushing this process may cause the button to detach shortly after application.
- Neglecting to Test the Button Fit: Before gluing, it’s important to ensure that the button fits properly in the designated area. If the button is too large or misaligned, it can lead to an uneven appearance and an ineffective attachment.
- Forgetting to Protect Surrounding Areas: When applying glue, it’s easy to accidentally get it on the surrounding fabric. Using painter’s tape or a protective cloth can help minimize any accidental spills or stains, ensuring the cap remains in good condition.