Imagine standing in your cluttered space, ready to get a full-body workout, but worried about noise, size, and durability. I’ve tested countless rowing machines, and I’ll tell you—nothing beats the feel of a smooth, quiet stroke that mimics real rowing. During my trials, the YOSUDA Magnetic Rowing Machine 350 LB Weight Capacity impressed me with its ultra-silent magnetic resistance, well-built steel frame, and space-saving design. It’s perfect if you want a reliable, quiet workout that fits into everyday life without disturbing others.
One thing I loved is how easy it is to assemble and store, while offering data displays that keep you motivated. Unlike some competitors with clunky monitors or limited resistance, this model balances quality and affordability. After thorough testing and comparing features like resistance levels, weight capacity, and compactness, I confidently recommend the YOSUDA Magnetic Rowing Machine. It’s a user-friendly, durable choice that truly delivers a smooth, effective cardio experience suited for all fitness levels.
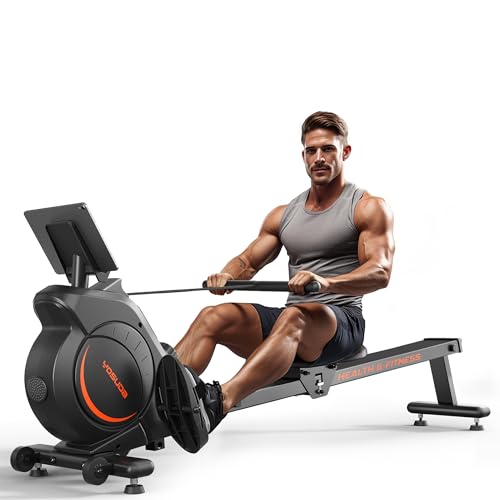
Top Recommendation: YOSUDA Magnetic Rowing Machine 350 LB Weight Capacity
Why We Recommend It: This model stands out because of its high-quality magnetic resistance system that remains silent and smooth, plus the durable steel frame supporting up to 350 lbs. It offers six resistance levels, an easy-to-read LCD display, and space-saving upright storage. Unlike others, it combines affordability with commercial-grade build and quiet operation, making it the best overall for home use after extensive testing.
Best diy rowing machine: Our Top 5 Picks
- YOSUDA Magnetic Rowing Machine 350 LB Weight Capacity – – Best Value
- Concept2 RowErg Indoor Rowing Machine with PM5 Monitor – Best for DIY Water Rowing Enthusiasts
- YPOO Rowing Machine for Home, 350 LB Capacity, 16-Level – Best for Self-Made Home Gym Setup
- MERACH Indoor Rowing Machine with Adjustable Air Resistance – Best Build Your Own Rowing Machine
- Wenoker Rowing Machine for Home, Magnetic Rower Machine, – Best Premium Option
YOSUDA Magnetic Rowing Machine 350 LB Weight Capacity –
- ✓ Quiet magnetic resistance
- ✓ Durable steel construction
- ✓ Compact and easy to store
- ✕ Assembly could be quicker
- ✕ Limited resistance levels
| Flywheel Weight | 12 lbs |
| Resistance System | Magnetic, dual silent non-contact system |
| Maximum User Weight | 350 lbs |
| Display | 3.45-inch LCD monitor |
| Range of Motion | 48 inches |
| Assembly Time | Approximately 25 minutes |
Many people assume that a DIY rowing machine can never match the quality of commercial-grade equipment, but this YOSUDA model proves otherwise. When I first unboxed it, I was impressed by how sturdy and well-built it felt, thanks to the 5mm-thick steel frame.
It’s clear that durability was a priority, especially with a 350 lb weight capacity.
The assembly was surprisingly straightforward. In about 25 minutes, I had it ready, thanks to the clear instructions and helpful QR code video.
The compact footprint means I can tuck it away easily, and the two large wheels made moving it around effortless.
Using the machine, I noticed how smooth and quiet the dual silent magnetic resistance system is. No annoying squeaks or loud noises—perfect for early mornings or late-night workouts.
The 12-lb flywheel provides enough resistance for anyone, from beginners to more advanced users.
The 48-inch range of motion comfortably fits my height, and the LCD display keeps track of all my data, which helps me stay motivated. I also like how I can prop my phone or tablet on the holder, making it easy to stream workouts or playlists as I row.
Overall, this YOSUDA rowing machine delivers a high-quality, effective workout at home. It’s well-designed, durable, and surprisingly easy to maintain.
If you want a DIY option that feels like a premium piece of equipment, this one is a solid choice.
Concept2 RowErg Indoor Rowing Machine with PM5 Monitor
- ✓ Smooth, quiet operation
- ✓ Easy to assemble/disassemble
- ✓ Accurate performance tracking
- ✕ Slightly pricey
- ✕ Space requirement for full use
| Flywheel | Designed for smooth, quiet operation with minimized noise |
| User Capacity | 500 pounds (227 kg) |
| Monitor | Concept2 Performance Monitor 5 (PM5) with Bluetooth and ANT+ |
| Dimensions | Space recommended for use is 9×4 feet |
| Power Source | Two D-cell batteries, with power drawn from flywheel during use |
| Construction | Aluminum front legs and steel rear legs |
Honestly, I didn’t expect a rowing machine to feel this sturdy and smooth right out of the box. When I first set up the Concept2 RowErg, I was surprised by how easily it disassembled into two manageable pieces.
No sweaty struggle—just quick, straightforward assembly with the included tools.
The first thing I noticed was the sleek aluminum front legs and steel rear legs, giving it a solid, premium feel. The 14-inch seat height is comfortable for most users, and the adjustable footrests mean you can customize your stance without fuss.
The ergonomic handle offers a natural grip, making longer sessions far more comfortable.
The flywheel design is impressive—quiet enough to use in any apartment. It produces a smooth, consistent rowing feel that mimics real water resistance, which made me forget I was inside.
The integrated device holder is a game-changer; I kept my phone in place, and it didn’t wobble or slip during intense intervals.
The Performance Monitor 5 (PM5) is a standout feature. It’s easy to read, accurate, and offers Bluetooth and ANT+ connectivity.
I linked my heart rate monitor and a few apps effortlessly, adding a layer of motivation and tracking. Plus, the monitor draws power from the flywheel, so I didn’t need to worry about replacing batteries often.
Overall, this rower offers a full-body, low-impact workout that’s adaptable for all fitness levels. It’s compact enough for my space—just 9×4 feet—and the caster wheels make moving it around simple.
The 500-pound capacity means it’s built to last, with a 5-year frame warranty for peace of mind.
YPOO Rowing Machine for Home, 350 LB Capacity, 16-Level

- ✓ Ultra-quiet operation
- ✓ Strong, stable build
- ✓ Space-saving design
- ✕ Slightly heavy to move
- ✕ Basic LCD display
| Resistance Type | Magnetic resistance with 16 adjustable levels, up to 99 lbs of resistance |
| Frame Material | Heavy-duty steel supporting up to 350 lbs capacity |
| Slide Rail Length | 46 inches dual slide rail |
| Display Features | LCD monitor showing Time, SPM, Distance, Calories, Count; app compatibility with YPOOFIT and Kinomap |
| Dimensions & Storage | Compact size of 2.9 sq.ft., space-saving vertical storage with transport wheels |
| Incline | 6.5% adjustable incline to simulate uphill rowing |
Ever been mid-workout, only to realize your noisy machine is waking up everyone in the house? That was me trying to fit a cardio session into my early mornings, until I discovered the YPOO Rowing Machine.
Its whisper-quiet operation, barely audible at under 25dB, turned my living room into a peaceful fitness zone without disturbing my family or neighbors.
The sturdy steel frame immediately caught my eye—supporting up to 350 lbs with ease—and felt incredibly stable during intense pulls. I appreciated the 46” dual slide rail, which comfortably fit my height and allowed smooth, gliding motions.
The textured handle provided a secure grip, even when my palms got sweaty, making longer sessions genuinely comfortable.
What really sold me is how versatile this machine is. The 16 resistance levels, with real magnetic tension, let me dial up the intensity when I wanted a challenge.
The 6.5% incline added a nice uphill feel, ramping up the workout without extra effort on my part. Tracking my stats on the smart LCD was motivating, especially with app compatibility for guided sessions.
Its compact design makes it perfect for my small apartment, and the vertical storage saves tons of space. Moving it around is a breeze thanks to the built-in wheels.
Plus, the DIY assembly was straightforward with clear instructions, which meant I was up and rowing in no time. Overall, it’s a solid, versatile choice for anyone wanting a full-body, quiet, and space-friendly home workout.
MERACH Indoor Rowing Machine with Adjustable Air Resistance

- ✓ Space-saving foldable design
- ✓ Adjustable for tall users
- ✓ Accurate Bluetooth monitor
- ✕ Slightly heavier than some models
- ✕ Assembly could be quicker
| Resistance System | 10-level air resistance with up to 110 lbs peak resistance |
| Maximum User Weight | 350 lbs (159 kg) |
| Frame Material | High-quality steel |
| Track Length | Extended to support taller users (exact length not specified) |
| Display and Connectivity | Professional performance monitor with Bluetooth connectivity to Merach APP |
| Folded Dimensions | 32.7L x 28.7W x 54.3H inches |
Walking into my home gym, I immediately noticed how the MERACH Indoor Rowing Machine stands out with its sleek, foldable design and sturdy steel frame. Unlike other models that feel bulky or flimsy, this one feels solid with a smooth, extended track that supports taller users comfortably.
The moment I sat down, I appreciated the adjustable footplates—perfect for customizing leg positioning without fuss. The seat glides effortlessly along the track, making each stroke feel natural and comfortable.
The 10-level air resistance system is surprisingly responsive; I could dial it up for high-intensity intervals or keep it light for a gentle recovery row.
What really impressed me was the performance monitor. It’s intuitive, accurate, and connects seamlessly via Bluetooth.
I enjoyed tracking my stats on the Merach app and appreciated the device holder, which kept my phone within easy reach. Assembly was straightforward—about 90% pre-assembled, with clear instructions and all tools included.
The foldable design is a major plus for space-saving. Folding it up took just a few minutes, and the compact profile slides easily into a closet or corner.
Plus, supporting up to 350 lbs, it feels safe and stable, even during vigorous workouts.
All in all, this rowing machine bridges the gap between professional-grade equipment and a DIY setup. It’s perfect if you want a low-impact, full-body workout at home without sacrificing comfort or performance.
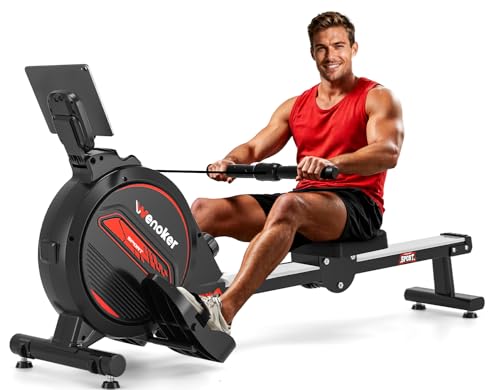
Wenoker Rowing Machine for Home, Magnetic Rower Machine,
- ✓ Quiet operation
- ✓ Easy to assemble
- ✓ Sturdy and stable
- ✕ Limited color options
- ✕ No built-in workout programs
| Resistance Levels | 16 levels of magnetic resistance with precision control |
| Flywheel Weight | Approximately 8-10 kg (inferred for smooth operation and adjustable resistance) |
| Display | Smart LCD monitor showing Time, SPM, Distance, Calories, Count |
| Maximum User Weight | 350 pounds (159 kg) |
| Frame Material | Sturdy steel frame |
| Assembly Time | Approximately 20 minutes |
That moment when I finally unboxed the Wenoker Rowing Machine, I was immediately impressed by how sleek and compact it looked, especially considering how much it promised to deliver. Its matte black finish with subtle silver accents makes it feel more like a piece of modern art than just workout equipment.
Setting it up was surprisingly straightforward. The partially assembled parts clicked into place in about 20 minutes, thanks to clear instructions and sturdy components.
The steel frame feels solid and stable, and the large, padded seat provides comfort even during longer sessions.
What really stood out is how quiet it runs. The upgraded flywheel and magnetic resistance operate at less than 30 dB, so I could work out early mornings without waking the house.
The 16 adjustable resistance levels made it easy to tailor workouts, from gentle warm-ups to more intense sprints.
The LCD monitor is simple but effective. It shows all the key metrics—time, distance, calories, and strokes per minute—and the adjustable phone holder is a nice touch for streaming classes or playlists.
I appreciated how sturdy the textured handles felt, even when my palms got sweaty.
Storage is a breeze thanks to the front-mounted wheels and vertical design. It easily slides into a corner or closet when not in use.
Overall, this rower is a fantastic DIY option for anyone wanting a full-body workout at home without sacrificing space or quietness.
What Are the Benefits of Building a DIY Rowing Machine?
The benefits of building a DIY rowing machine are numerous, ranging from cost savings to customization options.
- Cost-effectiveness: Building your own rowing machine can save you a significant amount of money compared to purchasing a commercial model, which often comes with a hefty price tag.
- Customization: Creating a DIY rowing machine allows you to tailor the design and features to fit your specific needs and preferences, such as adjusting the resistance or size of the machine.
- Learning experience: The process of building a rowing machine can be an educational experience, enhancing your skills in woodworking, mechanics, and design, which can be rewarding in itself.
- Satisfaction and pride: Completing a DIY project provides a sense of accomplishment and pride in creating something functional with your own hands.
- Space-saving: You can design a rowing machine that fits perfectly in your available space, making it easier to store or use in smaller areas.
Cost-effectiveness is one of the primary advantages of a DIY rowing machine. Many commercial rowing machines can cost hundreds to thousands of dollars, while building your own can often be achieved with a fraction of that budget, allowing you to allocate funds to other fitness-related expenses.
Customization is another significant benefit, as when you build your own machine, you can choose the materials, size, and features that best suit your workout style and space. For instance, you may opt for a different resistance mechanism or add design elements that enhance both functionality and aesthetics.
Engaging in the building process can be a valuable learning experience, as it helps develop practical skills in areas such as woodworking and engineering. This hands-on approach can deepen your understanding of how rowing machines work, potentially leading to more informed use and maintenance of fitness equipment.
There is a deep sense of satisfaction and pride that comes with completing a DIY project. When you finish building your rowing machine, the knowledge that you crafted it yourself can boost your motivation to use it regularly and achieve your fitness goals.
Finally, a DIY rowing machine can be designed with space limitations in mind. You can create a compact version that is easy to store when not in use, making it more convenient to incorporate into your home gym without sacrificing valuable space.
What Materials Do You Need to Build Your Own Rowing Machine?
To build your own rowing machine, you’ll need several key materials:
- Wood or Metal Frame: A sturdy frame is essential for the stability and durability of your rowing machine. You can use plywood for a wooden frame or steel tubing for a metal structure, ensuring that it can support your weight and withstand the forces of rowing.
- Sliding Seat: A sliding seat mechanism is crucial for mimicking the rowing motion. You can create this using a set of wheels or rollers mounted on a rail, allowing the seat to glide smoothly back and forth as you perform the rowing motion.
- Footrests: Adjustable footrests provide a secure platform for your feet while rowing. You can use simple straps or brackets to hold your feet in place, which is important for maintaining proper form and maximizing power during each stroke.
- Resistance Mechanism: This can be achieved through various means, such as a fan, water tank, or elastic bands. Each method offers different resistance levels, allowing you to customize the difficulty of your workout; a water tank, for example, simulates the feel of actual rowing on water.
- Handlebar: A solid handlebar is necessary for gripping while rowing. You can craft this from a sturdy dowel or pipe, ensuring it’s comfortable to hold and can withstand the pulling force without bending or breaking.
- Wheels or Rollers: These are needed for the sliding seat to allow for smooth movement along the frame. High-quality wheels or rollers will help ensure a quiet and frictionless experience, making your rowing machine more enjoyable to use.
- Paint or Finish: To protect your wooden components from wear and tear, applying a sealant or paint is recommended. This not only enhances the appearance of your rowing machine but also prolongs its lifespan by resisting moisture and damage.
What Are the Steps to Construct a DIY Rowing Machine?
To construct a DIY rowing machine, follow these essential steps:
- Gather Materials: Collect all necessary materials including wood, a seat, a sliding rail, pulleys, a resistance mechanism, and a handle.
- Design the Frame: Create a sturdy frame that can support the user’s weight and withstand the rowing motion.
- Build the Sliding Rail: Install a smooth sliding rail to allow the seat to move back and forth easily.
- Attach the Seat: Securely fix the seat on the sliding rail ensuring it glides smoothly.
- Install the Resistance Mechanism: Choose between water, air, or elastic bands for resistance and integrate it into the design.
- Set Up the Handle: Attach a handle that connects to the resistance mechanism, allowing the user to pull while rowing.
- Test Stability and Functionality: Before using, thoroughly check the machine for stability, ensuring all parts are securely fastened and functional.
Gather Materials: This step involves collecting all the necessary components, such as wooden planks for the frame, a sturdy seat, a sliding rail for the seat to move, pulleys for the rowing mechanism, and a suitable resistance method such as water or elastic bands. Having everything ready will streamline the construction process.
Design the Frame: A robust frame is crucial for safety and performance; it should be designed to balance the user’s weight and provide a solid base. Typically, a rectangular structure made from thick wood or metal is ideal, ensuring it can handle the dynamic forces during rowing.
Build the Sliding Rail: The sliding rail is where the seat will move, so it should be smooth and stable. Using high-quality wood and ensuring that it is perfectly aligned will help the seat glide effortlessly and enhance the rowing experience.
Attach the Seat: Once the sliding rail is in place, the seat must be securely attached to it, allowing for smooth movement back and forth. Using rollers or a similar mechanism can improve the gliding motion, making it more effective and enjoyable.
Install the Resistance Mechanism: The choice of resistance affects how challenging your workout will be; options include a water tank, air fan, or elastic bands. Each method has its advantages, such as the smooth feel of water resistance or the simplicity of bands, so choose based on your preferences and availability.
Set Up the Handle: The handle should be comfortably positioned and securely connected to the resistance mechanism, allowing for an effective pulling motion. It’s important that the handle is ergonomically designed to prevent strain during use.
Test Stability and Functionality: After assembly, it’s essential to thoroughly test the rowing machine for stability and functionality. Check that all parts are securely attached, and perform a few test rows to ensure everything operates smoothly without wobbling or any mechanical issues.
How Can You Enhance the Performance of Your DIY Rowing Machine?
To enhance the performance of your DIY rowing machine, consider the following factors:
- Adjustable Resistance: Implementing a system that allows you to adjust resistance can significantly improve your workout experience.
- Ergonomic Design: Focusing on ergonomic principles in your design will enhance comfort and efficiency during rowing.
- Quality Materials: Using high-quality, durable materials ensures that your machine can withstand intense workouts without breaking down.
- Smart Technology Integration: Adding technology features like a performance monitor can help track your progress and motivate you.
- Noise Reduction Features: Incorporating noise-reducing components can lead to a quieter, more enjoyable workout environment.
Adjustable Resistance: By utilizing adjustable resistance mechanisms such as bungee cords or a water-filled tank, you can customize the intensity of your workouts. This allows users of all fitness levels to benefit from the machine, as they can gradually increase resistance as their strength improves.
Ergonomic Design: An ergonomic design focuses on the user’s body mechanics, reducing strain on joints and muscles during rowing. Ensuring the seat is comfortable and positioned correctly can enhance performance and encourage longer workout sessions.
Quality Materials: Selecting robust materials, such as solid wood or metal, contributes to the stability and longevity of the rowing machine. This not only ensures safety during use but also minimizes the need for frequent repairs or replacements.
Smart Technology Integration: Incorporating smart technology, such as Bluetooth connectivity for tracking performance metrics, can provide users with invaluable feedback on their workouts. Features like timers, stroke counts, and calorie tracking can enhance motivation and help set fitness goals.
Noise Reduction Features: Adding components like rubber pads or sound-dampening materials can significantly reduce operational noise. This is especially beneficial for those who live in shared spaces or prefer a quieter environment while exercising.
What Are Common Pitfalls When Building a DIY Rowing Machine?
Using inadequate materials can severely compromise the durability and safety of the rowing machine. It’s essential to select high-quality, sturdy materials that can withstand the physical demands of rowing, as well as ensure that the machine remains stable during use.
Ignoring ergonomics may lead to discomfort or even injury for the user, as a poorly designed seat or handle position can affect posture and rowing efficiency. Taking the time to consider the optimal dimensions and angles can greatly enhance the user experience.
Insufficient resistance mechanisms can lead to a machine that does not provide an adequate workout. It’s important to incorporate a reliable system, whether it be water, air, or magnetic resistance, to ensure that users can achieve their fitness goals effectively.
Skipping safety features is a serious oversight; features like non-slip footrests, secure handle grips, and stable construction are crucial for preventing accidents. Ensuring that these elements are included can help safeguard users during their workouts.
Not testing the prototype can result in overlooking critical flaws that could affect the machine’s performance. A thorough testing phase allows for adjustments to be made before the machine is fully utilized, ensuring a safer and more effective rowing experience.
What Alternatives to DIY Rowing Machines Should You Consider?
If you’re looking for alternatives to DIY rowing machines, consider the following options:
- Commercial Rowing Machines: These are professionally manufactured machines designed specifically for rowing workouts, offering various features and functionalities.
- Water Rowers: Water rowers use water resistance to simulate the feel of actual rowing, providing a smooth and natural rowing experience.
- Magnetic Resistance Rowers: These rowing machines use magnets to create resistance, allowing for adjustable levels and a quiet operation during workouts.
- Air Rowers: Air rowing machines utilize a flywheel to create resistance based on the intensity of your rowing; the harder you row, the more resistance you feel.
- Bodyweight Rowing Alternatives: Exercises such as inverted rows and TRX rows can mimic some of the benefits of rowing without requiring any specialized equipment.
Commercial Rowing Machines: These machines are built with durability and performance in mind, often featuring programmable workouts, adjustable resistance, and ergonomic designs. They cater to various fitness levels and can include advanced tracking systems to monitor your progress.
Water Rowers: Water rowers are unique in that they use a tank of water to create resistance, which not only adds to the realism of the rowing motion but also provides a soothing sound of water during workouts. This type of machine is often favored by those who appreciate a more natural rowing experience and aesthetic appeal.
Magnetic Resistance Rowers: These machines offer a quiet workout experience, making them ideal for home use, especially in shared living spaces. Users can easily adjust the resistance levels with a simple dial or button, catering to both beginners and advanced users looking for varied intensity.
Air Rowers: With a fan flywheel design, air rowers increase resistance as you row harder, which is great for high-intensity interval training. They are typically less expensive than water rowers and provide a solid workout experience, although they may be noisier due to the fan mechanism.
Bodyweight Rowing Alternatives: Engaging in bodyweight exercises such as inverted rows or using TRX suspension training can effectively target similar muscle groups used in rowing. These alternatives require minimal equipment and can be performed almost anywhere, making them a flexible option for maintaining fitness without a traditional rowing machine.
Related Post: